> ## Documentation Index
> Fetch the complete documentation index at: https://specterops-bed-6715-managed-id-auth-method.mintlify.site/llms.txt
> Use this file to discover all available pages before exploring further.
# AzureHound Enterprise Azure Configuration
> Follow this guide to configure Microsoft Entra ID for AzureHound Enterprise data collection.
 For Certificate, Client Secret, and Username and Password authentication methods, creating a Microsoft Entra ID application registration is a prerequisite for AzureHound Enterprise data collection. If you are using **Azure Managed Identity** authentication, an app registration is not required — skip directly to [Configure authentication](#configure-authentication).
For app registration-based authentication, the setup involves the following steps:
```mermaid theme={null}
graph LR
A[Create a
new app
registration] --> B[Add
required API
permissions]
B --> C[Configure
authentication
methods]
C --> D[Create and
assign required
access roles]
```
For Certificate, Client Secret, and Username and Password authentication, some steps are required before you can complete the [AzureHound configuration](/install-data-collector/install-azurehound/create-configuration). At minimum, you must create the application registration because AzureHound requires an Entra ID **Directory (tenant) ID** and **Application (client) ID**. For **Azure Managed Identity** authentication, these steps are not required — see [Managed identity](#managed-identity-recommended) instead.
## Create a new app registration
This section guides you through the minimum steps to create a new application registration in Microsoft Entra ID for AzureHound Enterprise data collection.
See the Microsoft [documentation](https://learn.microsoft.com/en-us/entra/identity-platform/quickstart-register-app) for more information.
Log into the [Microsoft Entra admin center](https://entra.microsoft.com/) as a user with the [Global Administrator] role, or the following less privileged roles:
* [Privileged Role Administrator] AND
* [Application Administrator] OR [Cloud Application Administrator]
[Global Administrator]: https://learn.microsoft.com/en-us/entra/identity/role-based-access-control/permissions-reference#global-administrator
[Privileged Role Administrator]: https://learn.microsoft.com/en-us/entra/identity/role-based-access-control/permissions-reference#privileged-role-administrator
[Cloud Application Administrator]: https://learn.microsoft.com/en-us/entra/identity/role-based-access-control/permissions-reference#cloud-application-administrator
[Application Administrator]: https://learn.microsoft.com/en-us/entra/identity/role-based-access-control/permissions-reference#application-administrator
1. In the left menu, click **Entra ID** > **App registrations** > **New registration**.
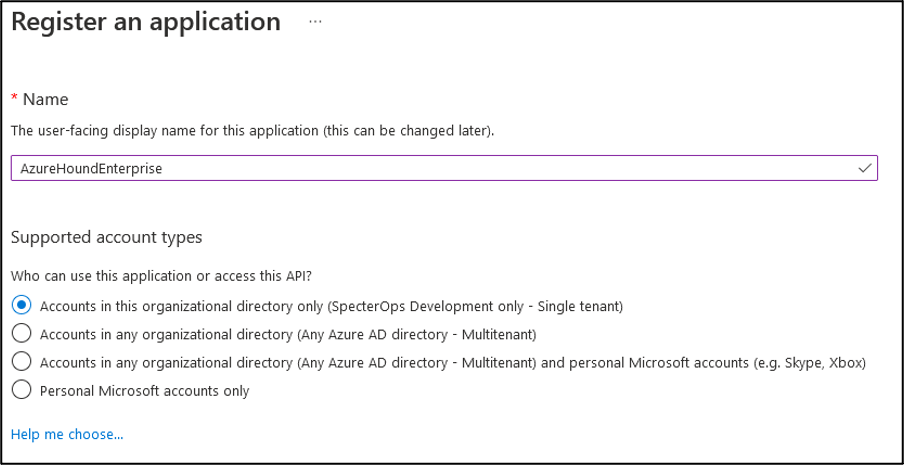
2. In the **Name** field, enter a name for the application to identify it in your organization.
Make sure the supported account type is set to the **Accounts in this organizational directory only (Single tenant)** option. A URI is not required.
For Certificate, Client Secret, and Username and Password authentication methods, creating a Microsoft Entra ID application registration is a prerequisite for AzureHound Enterprise data collection. If you are using **Azure Managed Identity** authentication, an app registration is not required — skip directly to [Configure authentication](#configure-authentication).
For app registration-based authentication, the setup involves the following steps:
```mermaid theme={null}
graph LR
A[Create a
new app
registration] --> B[Add
required API
permissions]
B --> C[Configure
authentication
methods]
C --> D[Create and
assign required
access roles]
```
For Certificate, Client Secret, and Username and Password authentication, some steps are required before you can complete the [AzureHound configuration](/install-data-collector/install-azurehound/create-configuration). At minimum, you must create the application registration because AzureHound requires an Entra ID **Directory (tenant) ID** and **Application (client) ID**. For **Azure Managed Identity** authentication, these steps are not required — see [Managed identity](#managed-identity-recommended) instead.
## Create a new app registration
This section guides you through the minimum steps to create a new application registration in Microsoft Entra ID for AzureHound Enterprise data collection.
See the Microsoft [documentation](https://learn.microsoft.com/en-us/entra/identity-platform/quickstart-register-app) for more information.
Log into the [Microsoft Entra admin center](https://entra.microsoft.com/) as a user with the [Global Administrator] role, or the following less privileged roles:
* [Privileged Role Administrator] AND
* [Application Administrator] OR [Cloud Application Administrator]
[Global Administrator]: https://learn.microsoft.com/en-us/entra/identity/role-based-access-control/permissions-reference#global-administrator
[Privileged Role Administrator]: https://learn.microsoft.com/en-us/entra/identity/role-based-access-control/permissions-reference#privileged-role-administrator
[Cloud Application Administrator]: https://learn.microsoft.com/en-us/entra/identity/role-based-access-control/permissions-reference#cloud-application-administrator
[Application Administrator]: https://learn.microsoft.com/en-us/entra/identity/role-based-access-control/permissions-reference#application-administrator
1. In the left menu, click **Entra ID** > **App registrations** > **New registration**.
2. In the **Name** field, enter a name for the application to identify it in your organization.
Make sure the supported account type is set to the **Accounts in this organizational directory only (Single tenant)** option. A URI is not required.
 3. Click **Register** to create the application registration.
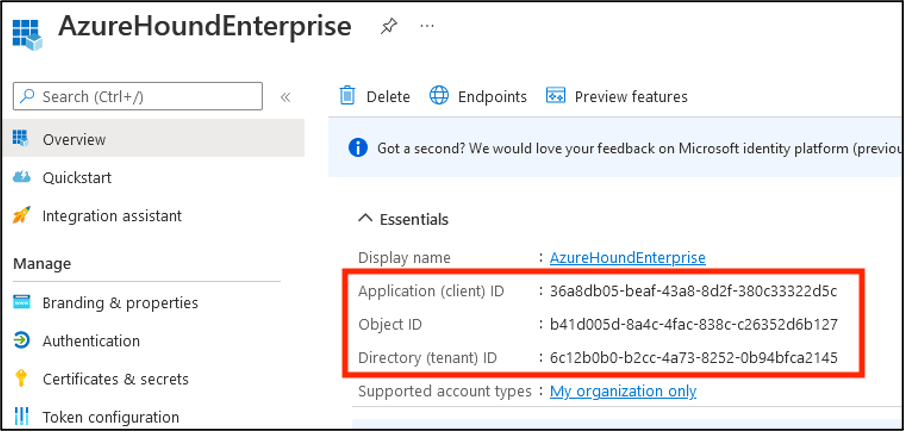
In the **Overview** menu, copy the **Application (client) ID** and **Directory (tenant) ID**.
You will need this information later to configure [AzureHound Enterprise](/install-data-collector/install-azurehound/create-configuration).
3. Click **Register** to create the application registration.
In the **Overview** menu, copy the **Application (client) ID** and **Directory (tenant) ID**.
You will need this information later to configure [AzureHound Enterprise](/install-data-collector/install-azurehound/create-configuration).
 ## Add required API permissions
This section describes how to configure the required Microsoft Graph API permissions for the AzureHound Enterprise application registration.
See the [Microsoft documentation](https://learn.microsoft.com/en-us/entra/identity-platform/quickstart-configure-app-access-web-apis#add-permissions-to-access-microsoft-graph) for more information.
This section applies to Certificate, Client Secret, and Username and Password authentication methods. For **Azure Managed Identity** authentication, Microsoft Graph permissions must be granted directly to the managed identity's service principal — see [Managed identity](#managed-identity-recommended) for details.
On the **Overview** page of the app registration, click **API Permissions**.
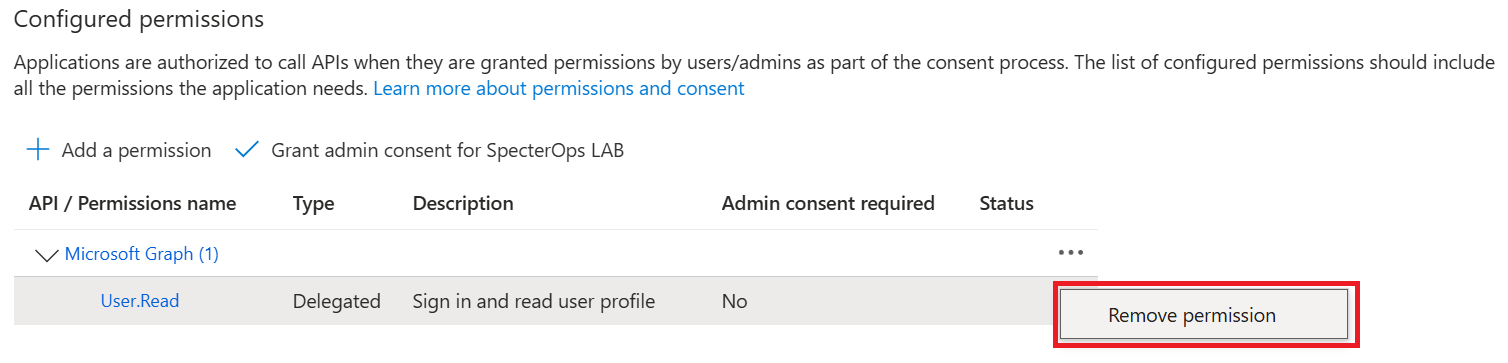
Remove the default **User.Read** delegated permission. It is not required for AzureHound Enterprise data collection.
## Add required API permissions
This section describes how to configure the required Microsoft Graph API permissions for the AzureHound Enterprise application registration.
See the [Microsoft documentation](https://learn.microsoft.com/en-us/entra/identity-platform/quickstart-configure-app-access-web-apis#add-permissions-to-access-microsoft-graph) for more information.
This section applies to Certificate, Client Secret, and Username and Password authentication methods. For **Azure Managed Identity** authentication, Microsoft Graph permissions must be granted directly to the managed identity's service principal — see [Managed identity](#managed-identity-recommended) for details.
On the **Overview** page of the app registration, click **API Permissions**.
Remove the default **User.Read** delegated permission. It is not required for AzureHound Enterprise data collection.
 1. Click **Add a permission** > **Microsoft Graph**.
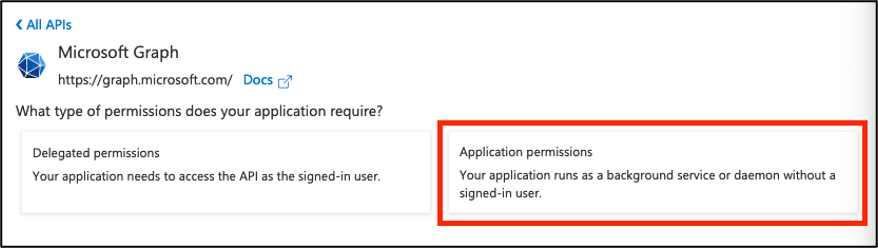
2. Select **Application permissions**.
1. Click **Add a permission** > **Microsoft Graph**.
2. Select **Application permissions**.
 3. Search for and check the box next to each of the following Microsoft Graph **application** permissions. See [AzureHound Data and Permissions: Entra ID](/collect-data/azurehound-data-permissions#entra-id) for details on the least-privilege approach:
| Permission | Purpose |
| ------------------------------- | -------------------------------------------------------------------------------------------------------------------------------------------- |
| `User.Read.All` | Enumerate users and user properties |
| `GroupMember.Read.All` | Enumerate groups, group owners, and group members |
| `Application.Read.All` | Enumerate applications, app owners, federated identity credentials, service principals, service principal owners, and app role assignments |
| `Device.Read.All` | Enumerate devices and device registered owners |
| `Organization.Read.All` | Read tenant/organization information |
| `RoleManagement.Read.Directory` | Enumerate Entra ID role definitions, role assignments, PIM eligible role assignments, and role management policy assignments |
| `AdministrativeUnit.Read.All` | Populate Administrative Unit properties on AU-scoped role assignments. Collected by AzureHound, not processed by BloodHound yet. |
| `AuditLog.Read.All` | (Optional) Collect `signInActivity` (last sign-in timestamps) on user objects. AzureHound gracefully degrades if this permission is missing. |
4. Click **Add permissions**.
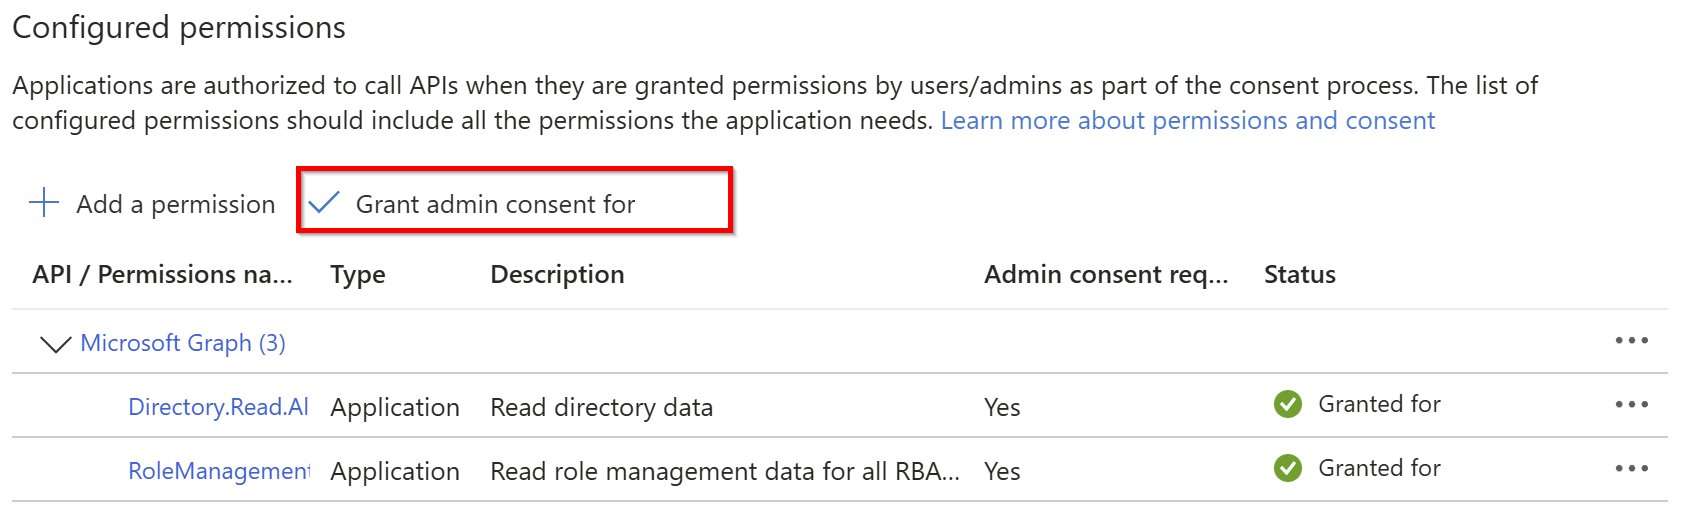
After adding the required permissions, you must grant admin consent for the application to use them.
1. Click **Grant admin consent for \**.
3. Search for and check the box next to each of the following Microsoft Graph **application** permissions. See [AzureHound Data and Permissions: Entra ID](/collect-data/azurehound-data-permissions#entra-id) for details on the least-privilege approach:
| Permission | Purpose |
| ------------------------------- | -------------------------------------------------------------------------------------------------------------------------------------------- |
| `User.Read.All` | Enumerate users and user properties |
| `GroupMember.Read.All` | Enumerate groups, group owners, and group members |
| `Application.Read.All` | Enumerate applications, app owners, federated identity credentials, service principals, service principal owners, and app role assignments |
| `Device.Read.All` | Enumerate devices and device registered owners |
| `Organization.Read.All` | Read tenant/organization information |
| `RoleManagement.Read.Directory` | Enumerate Entra ID role definitions, role assignments, PIM eligible role assignments, and role management policy assignments |
| `AdministrativeUnit.Read.All` | Populate Administrative Unit properties on AU-scoped role assignments. Collected by AzureHound, not processed by BloodHound yet. |
| `AuditLog.Read.All` | (Optional) Collect `signInActivity` (last sign-in timestamps) on user objects. AzureHound gracefully degrades if this permission is missing. |
4. Click **Add permissions**.
After adding the required permissions, you must grant admin consent for the application to use them.
1. Click **Grant admin consent for \**.
 2. Click **Yes** in the confirmation dialog.
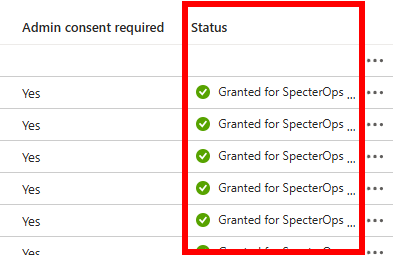
3. After being redirected to API Permissions again, you should see both permissions as **Granted**.
2. Click **Yes** in the confirmation dialog.
3. After being redirected to API Permissions again, you should see both permissions as **Granted**.
 ## Configure authentication
This section describes how to configure authentication methods for AzureHound Enterprise. AzureHound Enterprise supports the following authentication methods:
* Azure Managed Identity (recommended)
* Certificate
* Client Secret
* Username and Password
This section provides instructions for configuring the **Azure Managed Identity** and **Certificate** authentication methods. For information on other methods, see the Microsoft [documentation](https://learn.microsoft.com/en-us/entra/identity-platform/how-to-add-credentials).
### Managed identity (recommended)
Managed identities provide the most secure authentication method because they remove the need to manage credentials directly.
Microsoft [recommends](https://learn.microsoft.com/en-us/entra/identity/managed-identities-azure-resources/overview#use-managed-identities-for-azure-resources) user-assigned managed identities for Microsoft services, so this example uses the **user-assigned** type. AzureHound Enterprise also supports system-assigned managed identities, but that workflow is not covered in this guide.
For this setup, create a user-assigned managed identity in Azure and assign it to the Azure resource where you plan to run AzureHound Enterprise.
To complete [AzureHound configuration](/install-data-collector/install-azurehound/create-configuration), you will need the user-assigned managed identity **Client ID**. AzureHound Enterprise must run on the Azure resource where that identity is assigned.
Sign in to the [Azure portal](https://portal.azure.com/) and search for **Managed Identities** in the top search bar.
Click **Create** and enter the required information to create a new user-assigned managed identity.
See the Microsoft [documentation](https://learn.microsoft.com/en-us/entra/identity/managed-identities-azure-resources/manage-user-assigned-managed-identities-azure-portal) for more information.
Assign the user-assigned managed identity to the Azure resource where you plan to run AzureHound Enterprise, such as a virtual machine or app service.
Azure Managed Identity authentication only works when AzureHound Enterprise runs on an Azure resource that has access to the managed identity. See the Microsoft [documentation](https://learn.microsoft.com/en-us/entra/identity/managed-identities-azure-resources/managed-identities-status) for more information.
AzureHound authenticates directly as the managed identity — no app registration is involved. You must grant both types of required permissions directly to the managed identity's service principal:
* **Microsoft Graph API permissions** — The Azure portal provides no user interface for granting Microsoft Graph **application** permissions to a managed identity's service principal. You must use PowerShell (or Azure Cloud Shell) to assign these permissions directly. See [AzureHound Data and Permissions: Entra ID](/collect-data/azurehound-data-permissions#entra-id) for details on the least-privilege approach.
* **AzureHound Reader role** — Assign the AzureHound Reader custom role to the managed identity's service principal at the Tenant Root Group scope. See [Create and assign required access roles](#create-and-assign-required-access-roles) below.
The following PowerShell script (Microsoft Graph SDK) assigns all required Microsoft Graph application permissions to your managed identity's service principal. Replace the `$managedIdentityClientId` placeholder with the **Client ID** found in the Azure portal under **Managed Identities** > your identity > **Overview**.
```powershell theme={null}
<#
.SYNOPSIS
Grants Microsoft Graph application permissions to an Azure managed identity's
service principal for AzureHound Enterprise data collection.
.DESCRIPTION
The Azure portal provides no user interface for granting Microsoft Graph application
permissions to a managed identity's service principal. This script uses the
Microsoft Graph PowerShell SDK to assign the required least-privilege permissions
directly to the managed identity's existing service principal.
The required PowerShell module can be installed from the PowerShell Gallery:
Install-Module -Scope AllUsers -Repository PSGallery -Force -Name @(
Microsoft.Graph.Applications,
Microsoft.Graph.Authentication
)
.NOTES
Version: 1.0
#>
#Requires -Version 5
#Requires -Modules Microsoft.Graph.Applications,Microsoft.Graph.Authentication
# ---------------------------------------------------------------------------
# TODO: Replace with your managed identity's Client ID.
# Found in the Azure portal: Managed Identities > your identity > Overview.
# ---------------------------------------------------------------------------
[string] $managedIdentityClientId = ''
# Connect to Microsoft Graph with the scopes required to read service principals
# and grant app role assignments.
# Note: The -TenantId parameter is also required when using an External ID.
Connect-MgGraph -NoWelcome -ContextScope Process -Scopes @(
'Application.Read.All',
'AppRoleAssignment.ReadWrite.All'
)
# Resolve the managed identity's service principal by its Client ID (AppId).
[Microsoft.Graph.PowerShell.Models.IMicrosoftGraphServicePrincipal] $miServicePrincipal =
Get-MgServicePrincipal -Filter "AppId eq '$managedIdentityClientId'"
if (-not $miServicePrincipal) {
throw "No service principal found for managed identity Client ID '$managedIdentityClientId'."
}
# Fetch the Microsoft Graph service principal, resolved by its well-known,
# tenant-invariant AppId rather than DisplayName for robustness.
[Microsoft.Graph.PowerShell.Models.IMicrosoftGraphServicePrincipal] $microsoftGraph =
Get-MgServicePrincipal -Filter "AppId eq '00000003-0000-0000-c000-000000000000'"
# Define the least-privilege Microsoft Graph application permissions
# See: /collect-data/azurehound-data-permissions#entra-id
[string[]] $requiredPermissions = @(
'User.Read.All'
'GroupMember.Read.All'
'Application.Read.All'
'Device.Read.All'
'Organization.Read.All'
'RoleManagement.Read.Directory'
'AdministrativeUnit.Read.All'
'AuditLog.Read.All' # Optional: for signInActivity on user objects
)
# Assign each permission to the managed identity's service
# principal using New-MgServicePrincipalAppRoleAssignment.
foreach ($permission in $requiredPermissions) {
[Microsoft.Graph.PowerShell.Models.IMicrosoftGraphAppRole] $appRole =
$microsoftGraph.AppRoles | Where-Object Value -eq $permission
if (-not $appRole) {
throw "Permission '$permission' not found in Microsoft Graph app roles."
}
New-MgServicePrincipalAppRoleAssignment `
-ServicePrincipalId $miServicePrincipal.Id `
-PrincipalId $miServicePrincipal.Id `
-ResourceId $microsoftGraph.Id `
-AppRoleId $appRole.Id
}
Write-Host ''
Write-Host 'Microsoft Graph permissions granted to managed identity:' -ForegroundColor Green
$requiredPermissions | ForEach-Object { Write-Host " - $_" }
Write-Host ''
# Sign out from Microsoft Graph
Disconnect-MgGraph | Out-Null
```
### Certificate
Certificates provide stronger authentication than client secrets or username and password combinations, but you must manage and rotate them properly.
For this setup, you must also upload the certificate to the app registration if you're using the AzureHound Enterprise CLI tool to create the certificate.
If you have not already created a certificate, see [Create an AzureHound Configuration](/install-data-collector/install-azurehound/create-configuration) before proceeding.
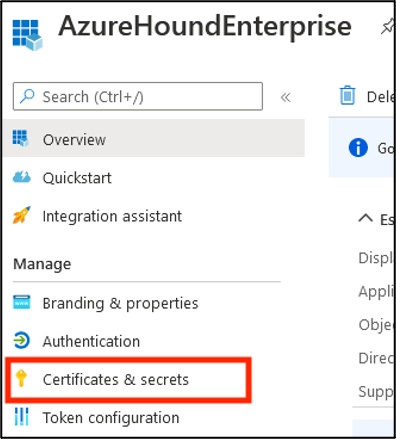
1. On the **Overview** page of the app registration, click **Certificates & secrets**.
## Configure authentication
This section describes how to configure authentication methods for AzureHound Enterprise. AzureHound Enterprise supports the following authentication methods:
* Azure Managed Identity (recommended)
* Certificate
* Client Secret
* Username and Password
This section provides instructions for configuring the **Azure Managed Identity** and **Certificate** authentication methods. For information on other methods, see the Microsoft [documentation](https://learn.microsoft.com/en-us/entra/identity-platform/how-to-add-credentials).
### Managed identity (recommended)
Managed identities provide the most secure authentication method because they remove the need to manage credentials directly.
Microsoft [recommends](https://learn.microsoft.com/en-us/entra/identity/managed-identities-azure-resources/overview#use-managed-identities-for-azure-resources) user-assigned managed identities for Microsoft services, so this example uses the **user-assigned** type. AzureHound Enterprise also supports system-assigned managed identities, but that workflow is not covered in this guide.
For this setup, create a user-assigned managed identity in Azure and assign it to the Azure resource where you plan to run AzureHound Enterprise.
To complete [AzureHound configuration](/install-data-collector/install-azurehound/create-configuration), you will need the user-assigned managed identity **Client ID**. AzureHound Enterprise must run on the Azure resource where that identity is assigned.
Sign in to the [Azure portal](https://portal.azure.com/) and search for **Managed Identities** in the top search bar.
Click **Create** and enter the required information to create a new user-assigned managed identity.
See the Microsoft [documentation](https://learn.microsoft.com/en-us/entra/identity/managed-identities-azure-resources/manage-user-assigned-managed-identities-azure-portal) for more information.
Assign the user-assigned managed identity to the Azure resource where you plan to run AzureHound Enterprise, such as a virtual machine or app service.
Azure Managed Identity authentication only works when AzureHound Enterprise runs on an Azure resource that has access to the managed identity. See the Microsoft [documentation](https://learn.microsoft.com/en-us/entra/identity/managed-identities-azure-resources/managed-identities-status) for more information.
AzureHound authenticates directly as the managed identity — no app registration is involved. You must grant both types of required permissions directly to the managed identity's service principal:
* **Microsoft Graph API permissions** — The Azure portal provides no user interface for granting Microsoft Graph **application** permissions to a managed identity's service principal. You must use PowerShell (or Azure Cloud Shell) to assign these permissions directly. See [AzureHound Data and Permissions: Entra ID](/collect-data/azurehound-data-permissions#entra-id) for details on the least-privilege approach.
* **AzureHound Reader role** — Assign the AzureHound Reader custom role to the managed identity's service principal at the Tenant Root Group scope. See [Create and assign required access roles](#create-and-assign-required-access-roles) below.
The following PowerShell script (Microsoft Graph SDK) assigns all required Microsoft Graph application permissions to your managed identity's service principal. Replace the `$managedIdentityClientId` placeholder with the **Client ID** found in the Azure portal under **Managed Identities** > your identity > **Overview**.
```powershell theme={null}
<#
.SYNOPSIS
Grants Microsoft Graph application permissions to an Azure managed identity's
service principal for AzureHound Enterprise data collection.
.DESCRIPTION
The Azure portal provides no user interface for granting Microsoft Graph application
permissions to a managed identity's service principal. This script uses the
Microsoft Graph PowerShell SDK to assign the required least-privilege permissions
directly to the managed identity's existing service principal.
The required PowerShell module can be installed from the PowerShell Gallery:
Install-Module -Scope AllUsers -Repository PSGallery -Force -Name @(
Microsoft.Graph.Applications,
Microsoft.Graph.Authentication
)
.NOTES
Version: 1.0
#>
#Requires -Version 5
#Requires -Modules Microsoft.Graph.Applications,Microsoft.Graph.Authentication
# ---------------------------------------------------------------------------
# TODO: Replace with your managed identity's Client ID.
# Found in the Azure portal: Managed Identities > your identity > Overview.
# ---------------------------------------------------------------------------
[string] $managedIdentityClientId = ''
# Connect to Microsoft Graph with the scopes required to read service principals
# and grant app role assignments.
# Note: The -TenantId parameter is also required when using an External ID.
Connect-MgGraph -NoWelcome -ContextScope Process -Scopes @(
'Application.Read.All',
'AppRoleAssignment.ReadWrite.All'
)
# Resolve the managed identity's service principal by its Client ID (AppId).
[Microsoft.Graph.PowerShell.Models.IMicrosoftGraphServicePrincipal] $miServicePrincipal =
Get-MgServicePrincipal -Filter "AppId eq '$managedIdentityClientId'"
if (-not $miServicePrincipal) {
throw "No service principal found for managed identity Client ID '$managedIdentityClientId'."
}
# Fetch the Microsoft Graph service principal, resolved by its well-known,
# tenant-invariant AppId rather than DisplayName for robustness.
[Microsoft.Graph.PowerShell.Models.IMicrosoftGraphServicePrincipal] $microsoftGraph =
Get-MgServicePrincipal -Filter "AppId eq '00000003-0000-0000-c000-000000000000'"
# Define the least-privilege Microsoft Graph application permissions
# See: /collect-data/azurehound-data-permissions#entra-id
[string[]] $requiredPermissions = @(
'User.Read.All'
'GroupMember.Read.All'
'Application.Read.All'
'Device.Read.All'
'Organization.Read.All'
'RoleManagement.Read.Directory'
'AdministrativeUnit.Read.All'
'AuditLog.Read.All' # Optional: for signInActivity on user objects
)
# Assign each permission to the managed identity's service
# principal using New-MgServicePrincipalAppRoleAssignment.
foreach ($permission in $requiredPermissions) {
[Microsoft.Graph.PowerShell.Models.IMicrosoftGraphAppRole] $appRole =
$microsoftGraph.AppRoles | Where-Object Value -eq $permission
if (-not $appRole) {
throw "Permission '$permission' not found in Microsoft Graph app roles."
}
New-MgServicePrincipalAppRoleAssignment `
-ServicePrincipalId $miServicePrincipal.Id `
-PrincipalId $miServicePrincipal.Id `
-ResourceId $microsoftGraph.Id `
-AppRoleId $appRole.Id
}
Write-Host ''
Write-Host 'Microsoft Graph permissions granted to managed identity:' -ForegroundColor Green
$requiredPermissions | ForEach-Object { Write-Host " - $_" }
Write-Host ''
# Sign out from Microsoft Graph
Disconnect-MgGraph | Out-Null
```
### Certificate
Certificates provide stronger authentication than client secrets or username and password combinations, but you must manage and rotate them properly.
For this setup, you must also upload the certificate to the app registration if you're using the AzureHound Enterprise CLI tool to create the certificate.
If you have not already created a certificate, see [Create an AzureHound Configuration](/install-data-collector/install-azurehound/create-configuration) before proceeding.
1. On the **Overview** page of the app registration, click **Certificates & secrets**.
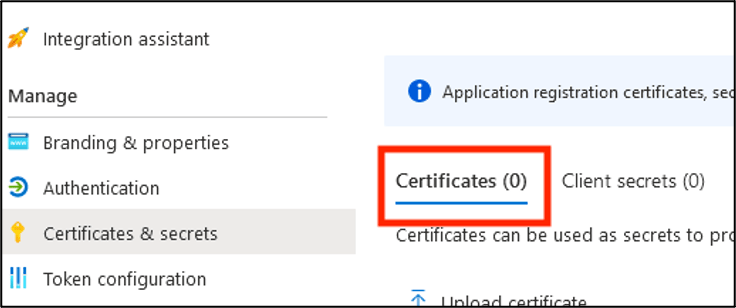
 2. Click **Certificates**.
 1. Click **Upload certificate**.
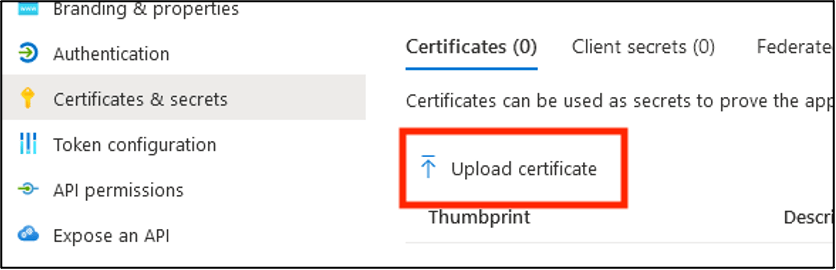 2. Locate the `cert.pem` file that you created during [AzureHound configuration](/install-data-collector/install-azurehound/create-configuration).
3. Click the folder icon, select the `cert.pem` file, and add a description (optional).
2. Locate the `cert.pem` file that you created during [AzureHound configuration](/install-data-collector/install-azurehound/create-configuration).
3. Click the folder icon, select the `cert.pem` file, and add a description (optional).
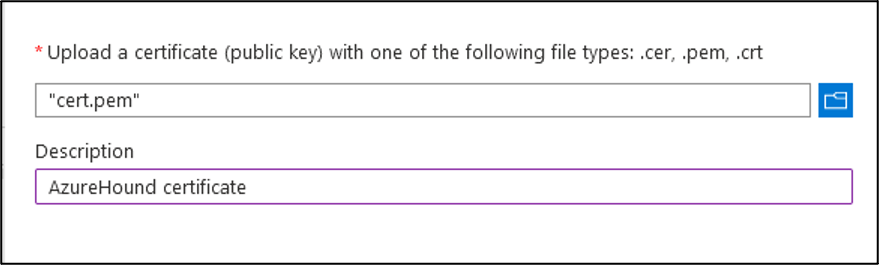 4. Click **Add**.
## Configure application branding
This section applies only if you created an app registration (Certificate, Client Secret, or Username and Password authentication). It does not apply to Azure Managed Identity authentication, since no app registration exists to brand.
Optionally, add branding to help users identify the AzureHound Enterprise application in the Entra ID admin center. These steps do not affect collector functionality.
You can download the [AzureHound Enterprise icon](/assets/icons/entra-bhe-app-icon.png) from this site to use for the application logo in the Entra ID admin center.
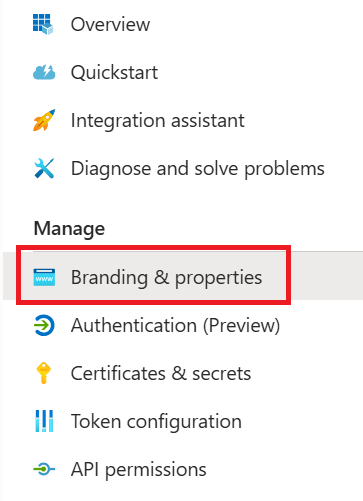
In the Entra ID admin center, navigate to the AzureHound Enterprise application and open the **Branding & properties** section.
4. Click **Add**.
## Configure application branding
This section applies only if you created an app registration (Certificate, Client Secret, or Username and Password authentication). It does not apply to Azure Managed Identity authentication, since no app registration exists to brand.
Optionally, add branding to help users identify the AzureHound Enterprise application in the Entra ID admin center. These steps do not affect collector functionality.
You can download the [AzureHound Enterprise icon](/assets/icons/entra-bhe-app-icon.png) from this site to use for the application logo in the Entra ID admin center.
In the Entra ID admin center, navigate to the AzureHound Enterprise application and open the **Branding & properties** section.
 Click **Select a file** and browse to the icon file you downloaded.
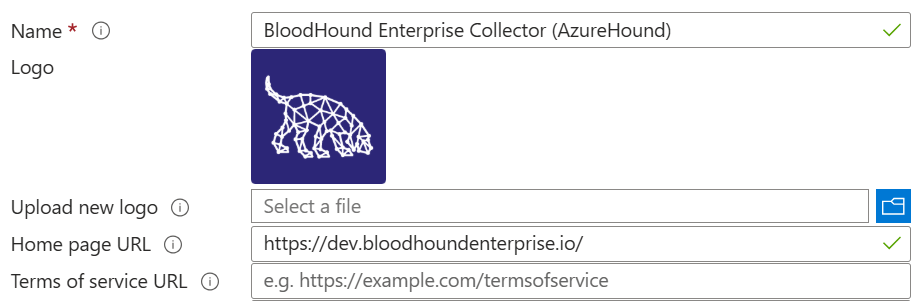
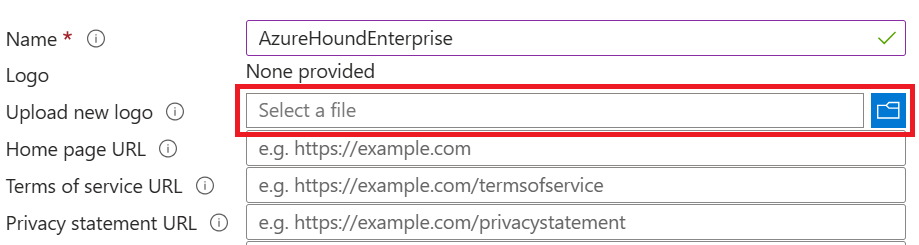 1. In the **Name** field, enter a human-readable name for the application, for example, **BloodHound Enterprise Collector (AzureHound)**.
2. In the **Home page URL** field, enter your BloodHound Enterprise tenant URL. This is for record keeping only.
Click **Save** and review the results.
1. In the **Name** field, enter a human-readable name for the application, for example, **BloodHound Enterprise Collector (AzureHound)**.
2. In the **Home page URL** field, enter your BloodHound Enterprise tenant URL. This is for record keeping only.
Click **Save** and review the results.
 ## Create and assign required access roles
This section describes how to assign the required access roles for AzureHound Enterprise data collection. For Certificate, Client Secret, and Username and Password authentication methods, assign the role to the app registration's service principal. For **Azure Managed Identity** authentication, assign the role to the managed identity's service principal instead.
The AzureHound Reader role is a least-privilege custom role that grants AzureHound the minimum permissions required to collect data from Azure Resource Manager. Assigning this role at the Tenant Root Group scope ensures AzureHound can collect data across all current and future subscriptions in the tenant.
If you don't have any management groups, you can skip this section. However, AzureHound will log a warning during each collection indicating it cannot collect management group data.
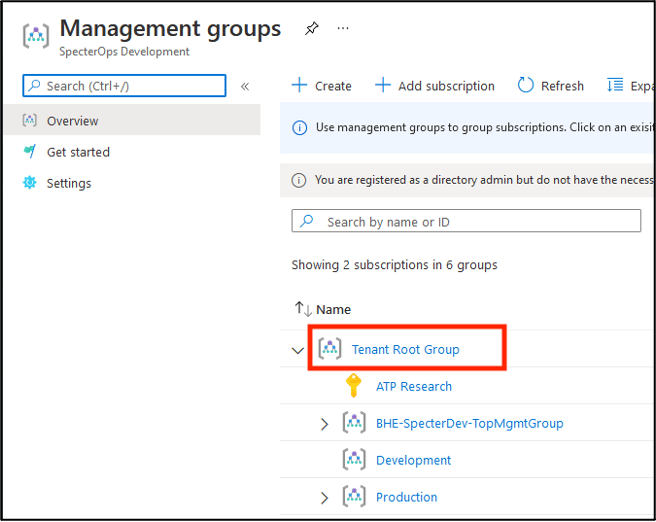
Alternatively, you can create your Tenant Root Group by following the prompts in the Azure portal. This ensures visibility if another administrator begins using subscriptions in the future.
1. Log into the [Azure portal](https://portal.azure.com/) as a user with the [User Access Administrator](https://learn.microsoft.com/en-us/azure/role-based-access-control/built-in-roles/privileged#user-access-administrator) role.
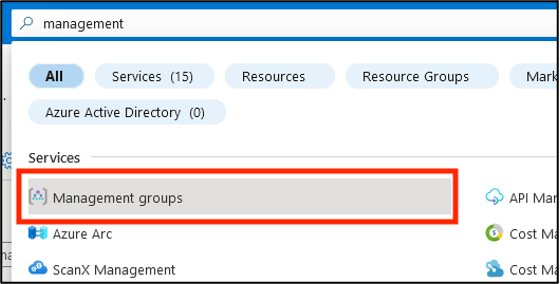
2. Search for and select the **Management groups** item in the top search bar.
## Create and assign required access roles
This section describes how to assign the required access roles for AzureHound Enterprise data collection. For Certificate, Client Secret, and Username and Password authentication methods, assign the role to the app registration's service principal. For **Azure Managed Identity** authentication, assign the role to the managed identity's service principal instead.
The AzureHound Reader role is a least-privilege custom role that grants AzureHound the minimum permissions required to collect data from Azure Resource Manager. Assigning this role at the Tenant Root Group scope ensures AzureHound can collect data across all current and future subscriptions in the tenant.
If you don't have any management groups, you can skip this section. However, AzureHound will log a warning during each collection indicating it cannot collect management group data.
Alternatively, you can create your Tenant Root Group by following the prompts in the Azure portal. This ensures visibility if another administrator begins using subscriptions in the future.
1. Log into the [Azure portal](https://portal.azure.com/) as a user with the [User Access Administrator](https://learn.microsoft.com/en-us/azure/role-based-access-control/built-in-roles/privileged#user-access-administrator) role.
2. Search for and select the **Management groups** item in the top search bar.
 3. Select **Tenant Root Group**.
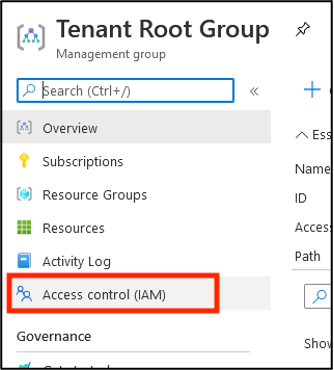
 1. Select **Access control (IAM)**.
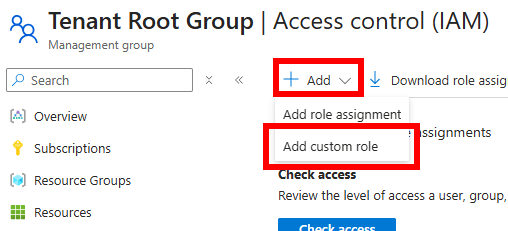
 2. Click **Add**, then **Add custom role**.
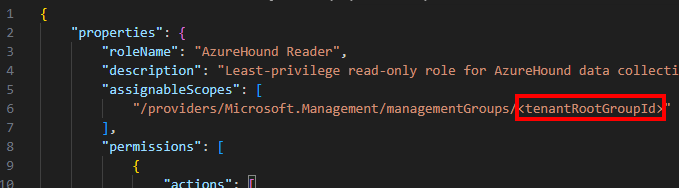
 3. Download azurehound-reader-role.json, open it in a text editor, and replace `` with your [Tenant Root Management Group ID](https://learn.microsoft.com/en-us/azure/governance/management-groups/overview#root-management-group-for-each-directory) (this is your Entra ID tenant ID).
 4. In **Basics** > **File**, upload the edited file and click **Review + create**.
 See [AzureHound Data Collection and Permissions: Azure Resource Manager](/collect-data/azurehound-data-permissions#azure-resource-manager) for details on each least-privilege permission in the AzureHound Reader role.
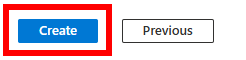
5. Review the role and click **Create** at the bottom of the page.
See [AzureHound Data Collection and Permissions: Azure Resource Manager](/collect-data/azurehound-data-permissions#azure-resource-manager) for details on each least-privilege permission in the AzureHound Reader role.
5. Review the role and click **Create** at the bottom of the page.
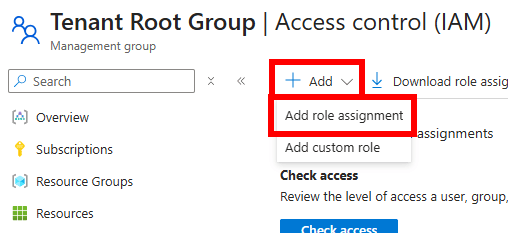
 1. Back in **Access control (IAM)**, click **Add**, then **Add role assignment**.
 2. Search for the **AzureHound Reader** role and select it.
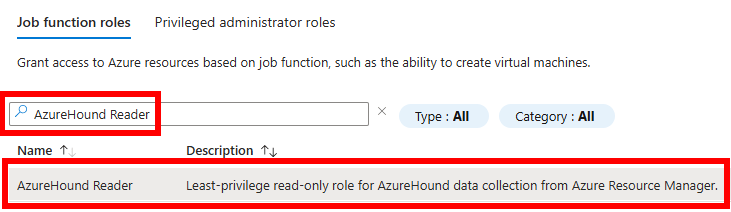 3. Click **Members**.
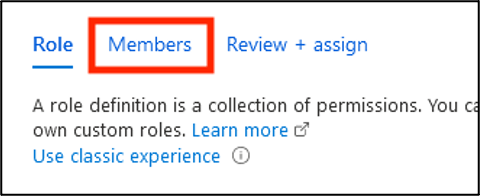 4. Click **Select members**.
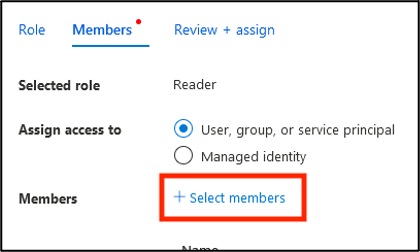 5. For **Azure Managed Identity** authentication, under **Assign access to**, select **Managed identity**. For Certificate, Client Secret, and Username and Password authentication, leave the default **User, group, or service principal** selected.
Managed identities do not appear in the default member picker. You must switch **Assign access to** to **Managed identity** first, or your search in the next step will return no results.
6. Search for and click on the service principal to assign the role to. For Certificate, Client Secret, and Username/Password authentication, select the AzureHound Enterprise app registration's service principal. For **Azure Managed Identity** authentication, select the managed identity's service principal.
5. For **Azure Managed Identity** authentication, under **Assign access to**, select **Managed identity**. For Certificate, Client Secret, and Username and Password authentication, leave the default **User, group, or service principal** selected.
Managed identities do not appear in the default member picker. You must switch **Assign access to** to **Managed identity** first, or your search in the next step will return no results.
6. Search for and click on the service principal to assign the role to. For Certificate, Client Secret, and Username/Password authentication, select the AzureHound Enterprise app registration's service principal. For **Azure Managed Identity** authentication, select the managed identity's service principal.
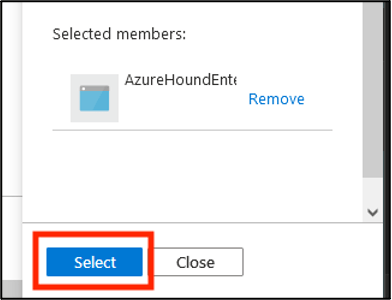
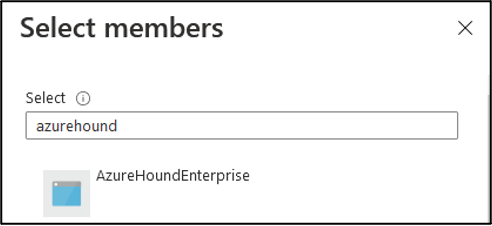 7. Validate the principal selected, then click **Select**.
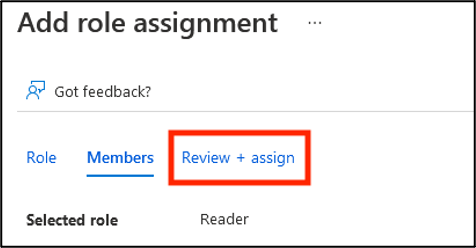
 1. Click the tab **Review + Assign**.
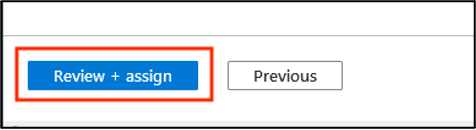
 2. Click **Review + Assign** at the bottom of the page.
 3. Confirm the role is present by refreshing this view. You may need to alter the filter to see this role.
## Scripted configuration
As an alternative to the manual steps described in this document, you can use **PowerShell** to automate the entire configuration process.
This script applies to **Certificate, Client Secret, and Username and Password** authentication methods only — it is not applicable for Managed Identity authentication.
The script below registers AzureHound in Entra ID, creates the least-privilege Azure Reader role, and assigns it to the service principal.
The script is **idempotent**—it safely handles re-runs by detecting existing resources and updating them as needed, preventing duplicate role definitions or assignments.
After running this script, follow the steps to [configure an authentication certificate](/install-data-collector/install-azurehound/azure-configuration#certificate) to complete the setup.
```powershell theme={null}
<#
.SYNOPSIS
Registers the Azure Data Exporter for BloodHound Enterprise (AzureHound)
as an application in Entra ID.
.DESCRIPTION
This script registers the Azure Data Exporter for BloodHound Enterprise (AzureHound)
as an application in Microsoft Entra ID and Azure, including all necessary read permissions
and a least-privilege custom Azure Reader role. The script is idempotent: on subsequent runs,
it detects existing role definitions and assignments, updates them if needed, and skips creation
to prevent duplicates.
The required PowerShell modules can be installed
from the PowerShell Gallery using the following command:
Install-Module -Scope AllUsers -Repository PSGallery -Force -Name @(
Microsoft.Graph.Applications,
Microsoft.Graph.Authentication,
Az.Resources,
Az.Accounts
)
.NOTES
Version: 1.1
#>
#Requires -Version 5
#Requires -Modules Microsoft.Graph.Applications,Microsoft.Graph.Authentication
#Requires -Modules Az.Resources,Az.Accounts
#region Entra ID
# Connect to Microsoft Entra ID through the Microsoft Graph API
# Note: The -TenantId parameter is also required when using an External ID.
Connect-MgGraph -NoWelcome -ContextScope Process -Scopes @(
'User.Read',
'Application.ReadWrite.All',
'AppRoleAssignment.ReadWrite.All'
)
# Register the AzureHound application
[string] $appName = 'BloodHound Enterprise Collector'
[string] $appDescription =
'Azure Data Exporter for BloodHound Enterprise (AzureHound)'
# TODO: Optionally provide the actual URL your BloodHound Enterprise tenant
[string] $homePage = 'https://specterops.io/bloodhound-enterprise'
[hashtable] $infoUrls = @{
MarketingUrl = 'https://specterops.io/bloodhound-enterprise'
TermsOfServiceUrl = 'https://specterops.io/terms-of-service'
PrivacyStatementUrl = 'https://specterops.io/privacy-policy'
SupportUrl = 'https://bloodhound.specterops.io/'
}
[hashtable] $webUrls = @{
HomePageUrl = $homePage
}
[Microsoft.Graph.PowerShell.Models.IMicrosoftGraphApplication] $registeredApp =
New-MgApplication -DisplayName $appName `
-Description $appDescription `
-Info $infoUrls `
-Web $webUrls `
-SignInAudience 'AzureADMyOrg'
# Configure the application logo
[string] $logoUrl =
'https://bloodhound.specterops.io/assets/icons/entra-bhe-app-icon.png'
[string] $tempLogoPath = New-TemporaryFile
Invoke-WebRequest -Uri $logoUrl `
-OutFile $tempLogoPath `
-UseBasicParsing `
-ErrorAction Stop
try {
Set-MgApplicationLogo -ApplicationId $registeredApp.Id `
-ContentType 'image/png' `
-InFile $tempLogoPath
}
finally {
# Delete the local copy of the logo from temp
Remove-Item -Path $tempLogoPath
}
# Make sure the app instance property lock is enabled
Update-MgApplication `
-ApplicationId $registeredApp.Id `
-ServicePrincipalLockConfiguration @{
IsEnabled = $true
AllProperties = $true
}
# Create the associated service principal object
[Microsoft.Graph.PowerShell.Models.IMicrosoftGraphServicePrincipal] $servicePrincipal =
New-MgServicePrincipal -DisplayName $appName `
-AppId $registeredApp.AppId `
-AccountEnabled `
-ServicePrincipalType Application `
-Notes $appDescription `
-Homepage $homePage `
-Tags 'WindowsAzureActiveDirectoryIntegratedApp','HideApp'
# Fetch the Microsoft Graph applicaton ID,
# which should be 00000003-0000-0000-c000-000000000000
[Microsoft.Graph.PowerShell.Models.IMicrosoftGraphServicePrincipal] $microsoftGraph =
Get-MgServicePrincipal -Filter "DisplayName eq 'Microsoft Graph'"
# Define the least-privilege Microsoft Graph application permissions
# See: /collect-data/azurehound-data-permissions#entra-id
[string[]] $requiredPermissions = @(
'User.Read.All'
'GroupMember.Read.All'
'Application.Read.All'
'Device.Read.All'
'Organization.Read.All'
'RoleManagement.Read.Directory'
'AdministrativeUnit.Read.All'
'AuditLog.Read.All' # Optional: for signInActivity on user objects
)
# Resolve each permission name to its AppRole definition
[Microsoft.Graph.PowerShell.Models.IMicrosoftGraphAppRole[]] $appRoles = $requiredPermissions | ForEach-Object {
[Microsoft.Graph.PowerShell.Models.IMicrosoftGraphAppRole] $role =
$microsoftGraph.AppRoles | Where-Object Value -eq $PSItem
if (-not $role) { throw "Permission '$PSItem' not found in Microsoft Graph app roles" }
$role
}
# Transform the app roles to the format required by Update-MgApplication
[hashtable[]] $resourceAccess = $appRoles | ForEach-Object {
@{ id = $PSItem.Id; type = 'Role' }
}
# Delegate the required API permissions
Update-MgApplication -ApplicationId $registeredApp.Id -RequiredResourceAccess @{
ResourceAppId = $microsoftGraph.AppId # 00000003-0000-0000-c000-000000000000
ResourceAccess = $resourceAccess
}
# Admin-consent each permission
foreach ($access in $resourceAccess) {
New-MgServicePrincipalAppRoleAssignment -ServicePrincipalId $servicePrincipal.Id `
-PrincipalId $servicePrincipal.Id `
-ResourceId $microsoftGraph.Id `
-AppRoleId $access.id
}
# Get the environment-specific Microsoft Graph API endpoint
# Azure Global: https://graph.microsoft.com
# Azure USGov: https://graph.microsoft.us
[string] $graphEndpoint =
(Get-MgEnvironment -Name (Get-MgContext).Environment).GraphEndpoint
# Fetch the info about the current user
[Microsoft.Graph.PowerShell.Models.IMicrosoftGraphDirectoryObject] $currentUser =
Invoke-MgGraphRequest -Method GET -Uri '/v1.0/me'
# OData IDs need to be used when assigning application ownership,
# e.g., https://graph.microsoft.com/v1.0/users/{bca3617a-4c54-45eb-9a32-744c1938242e}
[string] $currentUserOdataId = "$graphEndpoint/v1.0/users/{$($currentUser.Id)}"
# Assign the current user as the application object owner
New-MgApplicationOwnerByRef -ApplicationId $registeredApp.Id `
-OdataId $currentUserOdataId
# Assign the current user as the service principal owner
New-MgServicePrincipalOwnerByRef -ServicePrincipalId $servicePrincipal.Id `
-OdataId $currentUserOdataId
# Sign out from Microsoft Graph
Disconnect-MgGraph | Out-Null
#endregion Entra ID
#region Azure
# Optionally enable browser-based login on Windows 10 and later
Update-AzConfig -EnableLoginByWam $false
# Authenticate against Azure Resource Manager
Connect-AzAccount -Environment AzureCloud -Scope Process
# Load the AzureHound Reader custom role definition
[string] $roleDefinitionJson = @'
{
"properties": {
"roleName": "AzureHound Reader",
"description": "Least-privilege read-only role for AzureHound data collection from Azure Resource Manager.",
"assignableScopes": [
"/providers/Microsoft.Management/managementGroups/"
],
"permissions": [
{
"actions": [
"Microsoft.Resources/subscriptions/resourceGroups/read",
"Microsoft.Authorization/roleAssignments/read",
"Microsoft.Management/managementGroups/read",
"Microsoft.Management/managementGroups/descendants/read",
"Microsoft.Compute/virtualMachines/read",
"Microsoft.Compute/virtualMachineScaleSets/read",
"Microsoft.KeyVault/vaults/read",
"Microsoft.Web/sites/read",
"Microsoft.ContainerRegistry/registries/read",
"Microsoft.ContainerService/managedClusters/read",
"Microsoft.Automation/automationAccounts/read",
"Microsoft.Logic/workflows/read",
"Microsoft.Storage/storageAccounts/read",
"Microsoft.Storage/storageAccounts/blobServices/containers/read"
],
"notActions": [],
"dataActions": [],
"notDataActions": []
}
]
}
}
'@
if (-not (Test-Path -Path 'variable:servicePrincipal')) {
# Fetch the service principal if the Azure part of the script is executed independently
[Microsoft.Azure.PowerShell.Cmdlets.Resources.MSGraph.Models.ApiV10.IMicrosoftGraphServicePrincipal] $servicePrincipal =
Get-AzADServicePrincipal -DisplayName 'BloodHound Enterprise Collector'
}
# Fetch the Tenant Root Group
[guid] $currentTenantId = (Get-AzContext).Tenant.Id
[Microsoft.Azure.Commands.Resources.Models.ManagementGroups.PSManagementGroup] $rootManagementGroup =
Get-AzManagementGroup -GroupName $currentTenantId
# New-AzRoleDefinition expects a flat structure, not the nested `properties` wrapper
# used by the ARM portal upload format, so we must flatten it before passing it in.
[PSCustomObject] $roleDefinition = $roleDefinitionJson | ConvertFrom-Json
$flatRole = [PSCustomObject]@{
Name = $roleDefinition.properties.roleName
Description = $roleDefinition.properties.description
Actions = $roleDefinition.properties.permissions[0].actions
NotActions = $roleDefinition.properties.permissions[0].notActions
DataActions = $roleDefinition.properties.permissions[0].dataActions
NotDataActions = $roleDefinition.properties.permissions[0].notDataActions
AssignableScopes = @($roleDefinition.properties.assignableScopes |
ForEach-Object { $_ -replace '', $currentTenantId })
}
[string] $flatRolePath = New-TemporaryFile
$flatRole | ConvertTo-Json -Depth 10 | Set-Content -Path $flatRolePath
# Create the custom AzureHound Reader role
try {
$existingRole = Get-AzRoleDefinition -Name 'AzureHound Reader' -ErrorAction SilentlyContinue
if ($existingRole) {
$existingRole.Actions = $flatRole.Actions
$existingRole.NotActions = $flatRole.NotActions
$existingRole.DataActions = $flatRole.DataActions
$existingRole.NotDataActions = $flatRole.NotDataActions
$existingRole.Description = $flatRole.Description
$existingRole.AssignableScopes = $flatRole.AssignableScopes
[Microsoft.Azure.Commands.Resources.Models.Authorization.PSRoleDefinition] $azureHoundReaderRole =
Set-AzRoleDefinition -Role $existingRole
}
else {
[Microsoft.Azure.Commands.Resources.Models.Authorization.PSRoleDefinition] $azureHoundReaderRole =
New-AzRoleDefinition -InputFile $flatRolePath
}
}
finally {
Remove-Item -Path $flatRolePath
}
# Assign the AzureHound Reader role at the Tenant Root Group
$existingRoleAssignment = Get-AzRoleAssignment -ObjectId $servicePrincipal.Id `
-Scope $rootManagementGroup.Id `
-RoleDefinitionId $azureHoundReaderRole.Id `
-ErrorAction SilentlyContinue
if ($null -ne $existingRoleAssignment) {
[Microsoft.Azure.Commands.Resources.Models.Authorization.PSRoleAssignment] $readerRoleAssignment = $existingRoleAssignment
}
else {
[Microsoft.Azure.Commands.Resources.Models.Authorization.PSRoleAssignment] $readerRoleAssignment =
New-AzRoleAssignment -ObjectId $servicePrincipal.Id `
-Scope $rootManagementGroup.Id `
-RoleDefinitionId $azureHoundReaderRole.Id
}
# Sign out from Azure Resource Manager
Disconnect-AzAccount -Scope Process
#endregion Azure
#region Summary
Write-Host ''
Write-Host '=== Configuration Summary ===' -ForegroundColor Cyan
Write-Host ''
Write-Host 'Entra ID app registration:' -ForegroundColor Green
Write-Host " Application Name: $appName"
Write-Host " Application ID: $($registeredApp.AppId)"
Write-Host " Object ID: $($registeredApp.Id)"
Write-Host " Tenant ID: $currentTenantId"
Write-Host " Owner: $($currentUser.UserPrincipalName)"
Write-Host ''
Write-Host 'Microsoft Graph permissions (admin-consented):' -ForegroundColor Green
$requiredPermissions | ForEach-Object { Write-Host " - $_" }
Write-Host ''
Write-Host 'Azure Resource Manager:' -ForegroundColor Green
Write-Host " Custom Role: $($azureHoundReaderRole.Name)"
Write-Host " Role ID: $($azureHoundReaderRole.Id)"
Write-Host " Assigned Scope: $($rootManagementGroup.Id)"
Write-Host ''
Write-Host 'Remaining manual step:' -ForegroundColor Yellow
Write-Host ' Upload an authentication certificate to the app registration.'
Write-Host ' See: https://bloodhound.specterops.io/install-data-collector/install-azurehound/azure-configuration#certificate'
Write-Host ''
#endregion Summary
```
3. Confirm the role is present by refreshing this view. You may need to alter the filter to see this role.
## Scripted configuration
As an alternative to the manual steps described in this document, you can use **PowerShell** to automate the entire configuration process.
This script applies to **Certificate, Client Secret, and Username and Password** authentication methods only — it is not applicable for Managed Identity authentication.
The script below registers AzureHound in Entra ID, creates the least-privilege Azure Reader role, and assigns it to the service principal.
The script is **idempotent**—it safely handles re-runs by detecting existing resources and updating them as needed, preventing duplicate role definitions or assignments.
After running this script, follow the steps to [configure an authentication certificate](/install-data-collector/install-azurehound/azure-configuration#certificate) to complete the setup.
```powershell theme={null}
<#
.SYNOPSIS
Registers the Azure Data Exporter for BloodHound Enterprise (AzureHound)
as an application in Entra ID.
.DESCRIPTION
This script registers the Azure Data Exporter for BloodHound Enterprise (AzureHound)
as an application in Microsoft Entra ID and Azure, including all necessary read permissions
and a least-privilege custom Azure Reader role. The script is idempotent: on subsequent runs,
it detects existing role definitions and assignments, updates them if needed, and skips creation
to prevent duplicates.
The required PowerShell modules can be installed
from the PowerShell Gallery using the following command:
Install-Module -Scope AllUsers -Repository PSGallery -Force -Name @(
Microsoft.Graph.Applications,
Microsoft.Graph.Authentication,
Az.Resources,
Az.Accounts
)
.NOTES
Version: 1.1
#>
#Requires -Version 5
#Requires -Modules Microsoft.Graph.Applications,Microsoft.Graph.Authentication
#Requires -Modules Az.Resources,Az.Accounts
#region Entra ID
# Connect to Microsoft Entra ID through the Microsoft Graph API
# Note: The -TenantId parameter is also required when using an External ID.
Connect-MgGraph -NoWelcome -ContextScope Process -Scopes @(
'User.Read',
'Application.ReadWrite.All',
'AppRoleAssignment.ReadWrite.All'
)
# Register the AzureHound application
[string] $appName = 'BloodHound Enterprise Collector'
[string] $appDescription =
'Azure Data Exporter for BloodHound Enterprise (AzureHound)'
# TODO: Optionally provide the actual URL your BloodHound Enterprise tenant
[string] $homePage = 'https://specterops.io/bloodhound-enterprise'
[hashtable] $infoUrls = @{
MarketingUrl = 'https://specterops.io/bloodhound-enterprise'
TermsOfServiceUrl = 'https://specterops.io/terms-of-service'
PrivacyStatementUrl = 'https://specterops.io/privacy-policy'
SupportUrl = 'https://bloodhound.specterops.io/'
}
[hashtable] $webUrls = @{
HomePageUrl = $homePage
}
[Microsoft.Graph.PowerShell.Models.IMicrosoftGraphApplication] $registeredApp =
New-MgApplication -DisplayName $appName `
-Description $appDescription `
-Info $infoUrls `
-Web $webUrls `
-SignInAudience 'AzureADMyOrg'
# Configure the application logo
[string] $logoUrl =
'https://bloodhound.specterops.io/assets/icons/entra-bhe-app-icon.png'
[string] $tempLogoPath = New-TemporaryFile
Invoke-WebRequest -Uri $logoUrl `
-OutFile $tempLogoPath `
-UseBasicParsing `
-ErrorAction Stop
try {
Set-MgApplicationLogo -ApplicationId $registeredApp.Id `
-ContentType 'image/png' `
-InFile $tempLogoPath
}
finally {
# Delete the local copy of the logo from temp
Remove-Item -Path $tempLogoPath
}
# Make sure the app instance property lock is enabled
Update-MgApplication `
-ApplicationId $registeredApp.Id `
-ServicePrincipalLockConfiguration @{
IsEnabled = $true
AllProperties = $true
}
# Create the associated service principal object
[Microsoft.Graph.PowerShell.Models.IMicrosoftGraphServicePrincipal] $servicePrincipal =
New-MgServicePrincipal -DisplayName $appName `
-AppId $registeredApp.AppId `
-AccountEnabled `
-ServicePrincipalType Application `
-Notes $appDescription `
-Homepage $homePage `
-Tags 'WindowsAzureActiveDirectoryIntegratedApp','HideApp'
# Fetch the Microsoft Graph applicaton ID,
# which should be 00000003-0000-0000-c000-000000000000
[Microsoft.Graph.PowerShell.Models.IMicrosoftGraphServicePrincipal] $microsoftGraph =
Get-MgServicePrincipal -Filter "DisplayName eq 'Microsoft Graph'"
# Define the least-privilege Microsoft Graph application permissions
# See: /collect-data/azurehound-data-permissions#entra-id
[string[]] $requiredPermissions = @(
'User.Read.All'
'GroupMember.Read.All'
'Application.Read.All'
'Device.Read.All'
'Organization.Read.All'
'RoleManagement.Read.Directory'
'AdministrativeUnit.Read.All'
'AuditLog.Read.All' # Optional: for signInActivity on user objects
)
# Resolve each permission name to its AppRole definition
[Microsoft.Graph.PowerShell.Models.IMicrosoftGraphAppRole[]] $appRoles = $requiredPermissions | ForEach-Object {
[Microsoft.Graph.PowerShell.Models.IMicrosoftGraphAppRole] $role =
$microsoftGraph.AppRoles | Where-Object Value -eq $PSItem
if (-not $role) { throw "Permission '$PSItem' not found in Microsoft Graph app roles" }
$role
}
# Transform the app roles to the format required by Update-MgApplication
[hashtable[]] $resourceAccess = $appRoles | ForEach-Object {
@{ id = $PSItem.Id; type = 'Role' }
}
# Delegate the required API permissions
Update-MgApplication -ApplicationId $registeredApp.Id -RequiredResourceAccess @{
ResourceAppId = $microsoftGraph.AppId # 00000003-0000-0000-c000-000000000000
ResourceAccess = $resourceAccess
}
# Admin-consent each permission
foreach ($access in $resourceAccess) {
New-MgServicePrincipalAppRoleAssignment -ServicePrincipalId $servicePrincipal.Id `
-PrincipalId $servicePrincipal.Id `
-ResourceId $microsoftGraph.Id `
-AppRoleId $access.id
}
# Get the environment-specific Microsoft Graph API endpoint
# Azure Global: https://graph.microsoft.com
# Azure USGov: https://graph.microsoft.us
[string] $graphEndpoint =
(Get-MgEnvironment -Name (Get-MgContext).Environment).GraphEndpoint
# Fetch the info about the current user
[Microsoft.Graph.PowerShell.Models.IMicrosoftGraphDirectoryObject] $currentUser =
Invoke-MgGraphRequest -Method GET -Uri '/v1.0/me'
# OData IDs need to be used when assigning application ownership,
# e.g., https://graph.microsoft.com/v1.0/users/{bca3617a-4c54-45eb-9a32-744c1938242e}
[string] $currentUserOdataId = "$graphEndpoint/v1.0/users/{$($currentUser.Id)}"
# Assign the current user as the application object owner
New-MgApplicationOwnerByRef -ApplicationId $registeredApp.Id `
-OdataId $currentUserOdataId
# Assign the current user as the service principal owner
New-MgServicePrincipalOwnerByRef -ServicePrincipalId $servicePrincipal.Id `
-OdataId $currentUserOdataId
# Sign out from Microsoft Graph
Disconnect-MgGraph | Out-Null
#endregion Entra ID
#region Azure
# Optionally enable browser-based login on Windows 10 and later
Update-AzConfig -EnableLoginByWam $false
# Authenticate against Azure Resource Manager
Connect-AzAccount -Environment AzureCloud -Scope Process
# Load the AzureHound Reader custom role definition
[string] $roleDefinitionJson = @'
{
"properties": {
"roleName": "AzureHound Reader",
"description": "Least-privilege read-only role for AzureHound data collection from Azure Resource Manager.",
"assignableScopes": [
"/providers/Microsoft.Management/managementGroups/"
],
"permissions": [
{
"actions": [
"Microsoft.Resources/subscriptions/resourceGroups/read",
"Microsoft.Authorization/roleAssignments/read",
"Microsoft.Management/managementGroups/read",
"Microsoft.Management/managementGroups/descendants/read",
"Microsoft.Compute/virtualMachines/read",
"Microsoft.Compute/virtualMachineScaleSets/read",
"Microsoft.KeyVault/vaults/read",
"Microsoft.Web/sites/read",
"Microsoft.ContainerRegistry/registries/read",
"Microsoft.ContainerService/managedClusters/read",
"Microsoft.Automation/automationAccounts/read",
"Microsoft.Logic/workflows/read",
"Microsoft.Storage/storageAccounts/read",
"Microsoft.Storage/storageAccounts/blobServices/containers/read"
],
"notActions": [],
"dataActions": [],
"notDataActions": []
}
]
}
}
'@
if (-not (Test-Path -Path 'variable:servicePrincipal')) {
# Fetch the service principal if the Azure part of the script is executed independently
[Microsoft.Azure.PowerShell.Cmdlets.Resources.MSGraph.Models.ApiV10.IMicrosoftGraphServicePrincipal] $servicePrincipal =
Get-AzADServicePrincipal -DisplayName 'BloodHound Enterprise Collector'
}
# Fetch the Tenant Root Group
[guid] $currentTenantId = (Get-AzContext).Tenant.Id
[Microsoft.Azure.Commands.Resources.Models.ManagementGroups.PSManagementGroup] $rootManagementGroup =
Get-AzManagementGroup -GroupName $currentTenantId
# New-AzRoleDefinition expects a flat structure, not the nested `properties` wrapper
# used by the ARM portal upload format, so we must flatten it before passing it in.
[PSCustomObject] $roleDefinition = $roleDefinitionJson | ConvertFrom-Json
$flatRole = [PSCustomObject]@{
Name = $roleDefinition.properties.roleName
Description = $roleDefinition.properties.description
Actions = $roleDefinition.properties.permissions[0].actions
NotActions = $roleDefinition.properties.permissions[0].notActions
DataActions = $roleDefinition.properties.permissions[0].dataActions
NotDataActions = $roleDefinition.properties.permissions[0].notDataActions
AssignableScopes = @($roleDefinition.properties.assignableScopes |
ForEach-Object { $_ -replace '', $currentTenantId })
}
[string] $flatRolePath = New-TemporaryFile
$flatRole | ConvertTo-Json -Depth 10 | Set-Content -Path $flatRolePath
# Create the custom AzureHound Reader role
try {
$existingRole = Get-AzRoleDefinition -Name 'AzureHound Reader' -ErrorAction SilentlyContinue
if ($existingRole) {
$existingRole.Actions = $flatRole.Actions
$existingRole.NotActions = $flatRole.NotActions
$existingRole.DataActions = $flatRole.DataActions
$existingRole.NotDataActions = $flatRole.NotDataActions
$existingRole.Description = $flatRole.Description
$existingRole.AssignableScopes = $flatRole.AssignableScopes
[Microsoft.Azure.Commands.Resources.Models.Authorization.PSRoleDefinition] $azureHoundReaderRole =
Set-AzRoleDefinition -Role $existingRole
}
else {
[Microsoft.Azure.Commands.Resources.Models.Authorization.PSRoleDefinition] $azureHoundReaderRole =
New-AzRoleDefinition -InputFile $flatRolePath
}
}
finally {
Remove-Item -Path $flatRolePath
}
# Assign the AzureHound Reader role at the Tenant Root Group
$existingRoleAssignment = Get-AzRoleAssignment -ObjectId $servicePrincipal.Id `
-Scope $rootManagementGroup.Id `
-RoleDefinitionId $azureHoundReaderRole.Id `
-ErrorAction SilentlyContinue
if ($null -ne $existingRoleAssignment) {
[Microsoft.Azure.Commands.Resources.Models.Authorization.PSRoleAssignment] $readerRoleAssignment = $existingRoleAssignment
}
else {
[Microsoft.Azure.Commands.Resources.Models.Authorization.PSRoleAssignment] $readerRoleAssignment =
New-AzRoleAssignment -ObjectId $servicePrincipal.Id `
-Scope $rootManagementGroup.Id `
-RoleDefinitionId $azureHoundReaderRole.Id
}
# Sign out from Azure Resource Manager
Disconnect-AzAccount -Scope Process
#endregion Azure
#region Summary
Write-Host ''
Write-Host '=== Configuration Summary ===' -ForegroundColor Cyan
Write-Host ''
Write-Host 'Entra ID app registration:' -ForegroundColor Green
Write-Host " Application Name: $appName"
Write-Host " Application ID: $($registeredApp.AppId)"
Write-Host " Object ID: $($registeredApp.Id)"
Write-Host " Tenant ID: $currentTenantId"
Write-Host " Owner: $($currentUser.UserPrincipalName)"
Write-Host ''
Write-Host 'Microsoft Graph permissions (admin-consented):' -ForegroundColor Green
$requiredPermissions | ForEach-Object { Write-Host " - $_" }
Write-Host ''
Write-Host 'Azure Resource Manager:' -ForegroundColor Green
Write-Host " Custom Role: $($azureHoundReaderRole.Name)"
Write-Host " Role ID: $($azureHoundReaderRole.Id)"
Write-Host " Assigned Scope: $($rootManagementGroup.Id)"
Write-Host ''
Write-Host 'Remaining manual step:' -ForegroundColor Yellow
Write-Host ' Upload an authentication certificate to the app registration.'
Write-Host ' See: https://bloodhound.specterops.io/install-data-collector/install-azurehound/azure-configuration#certificate'
Write-Host ''
#endregion Summary
```